Feeds:
Posts
Comments

Posts Tagged ‘tutorial’

Hello everyone! I hope you are all doing well and getting lots of sewing done! If you haven’t entered into my blog hop give-away, go check it out here! You have until September 6th to enter.

I have recently started my fall semester at college this year, and I found a lanyard at the bookstore with the school’s name on it for 25$! As much as I would love to demonstrate my school pride, I was not interested in paying so much for such a simple device. (especially with the large amount of money I just spent on my school books!) I went home, and dug through my scrap bag and after a few failed attempts, I came up with a unique style that is perfect for the quilter in me.

The finished project will be 1″ wide. Adjusting the length of your strip can give you longer or shorter lanyards. I had some scraps left over so I also made a few keychain size ones! (** please forgive me for switching between different colored pieces in my tutorial, It was hard to keep track while making them all! All of the strips in these pictures are the same length and width.)

You will need:

Scraps, 4″ wide (to make a solid color, you just need a 4″ wide strip as long as your measurement from the first step in “Assembly”)
1″ Key ring or other hardware of your choosing (I got a grab bag of findings from Hobby Lobby for about 1$)
Matching thread
Tape measure
Iron and ironing board

Assembly:

1. Take a tape measure, pretend it is a lanyard and use it to measure how long you would like your finished piece to be.  From the point where the end meets, add 3″. (ex, my measurement was 44″, add 3, your final measurement is 47″)

This is how the 47″ finished piece falls on me.

2. Seam your 4″ scraps together until you have a strip as long as your measurement. Press your seams open. (pressing to one side will add lots of bulk and make it difficult to sew together)

3. Press your strip in half lengthwise.

4. Open your strip, and press each side into the middle using your pressed line as a guide.

5. Press again down your strip with both of the sides folded in together.

6. Now head over to the sewing machine. Sew as close as you can to the edge (approx. 1/8″) all the way down the open side of your strip. (***make sure your edges are together!) I like to use a zipper foot for this step so I can see exactly where I am sewing. Once you finish the open side, turn your strip around and sew down the other side the same way, as close to the edge as you can.

7. Take your lanyard and lay it out flat. Put the ends together and flip one side so your lanyard lays like this. This will allow your lanyard to lay flat against your chest while wearing it.  Put a pin about 7 inches up from the bottom to hold it together in this position.

sewn on both sides

Finishing your lanyard:

1. Pull your hardware through one of the ends of your lanyard and fold the fabric up over it, about 1.5″ to 2″.

2. Fold the other side up, and stagger it slightly so it does not fold over where the hardware is.

Make sure your raw edges are even.

3. At your sewing machine, switch back to your normal presser foot if you switched and lay your lanyard underneath. Sew a square to secure your edges together, back stitch a few times at the beginning and the end. (***Please be careful and go slowly, you don’t want to accidentally sew over your hardware and break your needle.) When you come to an edge, leave your needle down and pick up your presser foot. Pivot your lanyard and sew again.


4. Trim your threads and you are finished!

I hope you enjoyed this tutorial. If you have any questions feel free to ask here in the comments or contact me through my email. Until next time, Happy Quilting everyone!

Read Full Post »

Here is a quick and easy idea for a custom cover for your sewing machine! This can be adapted for almost anything, but this example is for my sisters Brother sewing machine. How cute is that?

You will need:

  • either a jelly roll, a fat quarter bundle, or assorted scraps, (as long as they can be cut into 2 1/2″ strips. Your strips need to be as wide as your width measurement for you machine.)
  • yardage for the backing
  • yardage of thin batting, same size as your backing
  • thread
  • either extra scraps or a coordinating fabric for the binding.
  • 24″ of ribbon in a coordinating color. (I used the ribbon that was tied around my FQ bundle)
  • temporary basting spray (you can use pins if you do not have any )

Measuring your machine:

Measure all the way around the widest part of your machine, usually the base. Add 5″ to this measurement. This is your WIDTH.
Now measure from the bottom of your machine over the top at the highest point and down the back to the base again.  This is your LENGTH.

Assembly:

1. Take your yardage and batting and cut a piece of each in the size of your LENGTH x WIDTH. Spray the batting with your basting spray and lightly lay your backing fabric wrong side to the batting. Using the basting spray really helps hold your “sandwich” together as you quilt!

2. If your fabric is not already cut into 2 1/2″ strips (like a jelly roll) cut your fabric. It is easiest to cut strips using a long ruler with a rotary blade. Trim the strips to the measurement of your WIDTH.

3. Lay your strips out on top of your “sandwich” in a pattern you like. Some options are light to dark, random or maybe a repeating pattern. For this one, we used 5 different patterns from a fat quarter bundle and used a repeating pattern. Place your strips aside except for the strip on the farthest right.

4. Lay your first strip down about a 1/4 away from the edge of your “sandwich”. Pin your strip down along the right side. Sew 1/4″ seam down the strip.

Sew your seam on the edge, 1/4″

5. Lay your next strip directly on top of the first, right sides together and pin. Sew a 1/4″ seam starting from the opposite side you sewed from on the first strip. **Alternating the direction you sew from on each strip will minimize the pulling on your backing fabric.

Right sides together, pin and sew!

6. Repeat adding strips until you have reached the end of your “sandwich.” Sew a 1/4″ seam on the last strip’s edge to fasten the last side to the back.

7. Lay your cover over your machine and trim it to your liking. This one touches the table surface on both sides. You may make yours shorter if you like!

Finishing your cover:

1. Cut your ribbon into 6″ pieces. Sew your binding to the back of the quilt, placing your ribbon pieces under the binding about  5″ up from the bottom and top on the LENGTH sides. Use a 1/4″ seam.

Sew your ribbons into the binding on the backing side.

2. Once you have finished sewing your binding onto the back, turn the binding to the front and stitch it down with a zig-zag (or any decorative stitch you like!) When you come to where your ribbons are, pull them so they stick out to the sides. This helps the ribbons always stay out where they can be easily reached.

Finished binding with zig-zag from the back.

You’re all finished! Lay your cover over you machine and tie the ribbons. How easy was that?

I hope you enjoyed this tutorial! Let me know in the comments if you have any questions, and please let me know if you make this! I would love to see pictures.  Happy sewing everyone!

Read Full Post »

My sister came for a visit this past week, and we decided to make a tube quilt together, I this specific one is sometimes called ‘summer in the park’ or ‘walk in the park’ but i’m not entirely sure. Lots of pictures for this one, here goes!

We used 4 jelly rolls for this quilt with a 5″ border and it ended up just shy of king size. If you dont have jelly rolls to use, you can make your own by cutting 2 and 1/2″  strips of fabric along the width (typically 45″). These can be any colors you like. For this quilt we picked a mix of blues and greens. You will also need:

A large square or rectangle rotary ruler with a 45 degree angle marked

Rotary mat and cutter


Take your strips and match them up in groups of four, in color orders you like. Sew these in pairs together with a 1/4″ seam and press open to one side.


Guest appearance by my sister Mindy holding the pressed open two strip pair.

Take your two pairs and lay them right sides together. Sew them together on both sides, keeping the 1/4″ seam down one side, then turn the tube and go the opposite direction on the other side to prevent bulges from stress on the fabric.


Head over to your cutting mat, and lay the tube flat. Trim the edge.

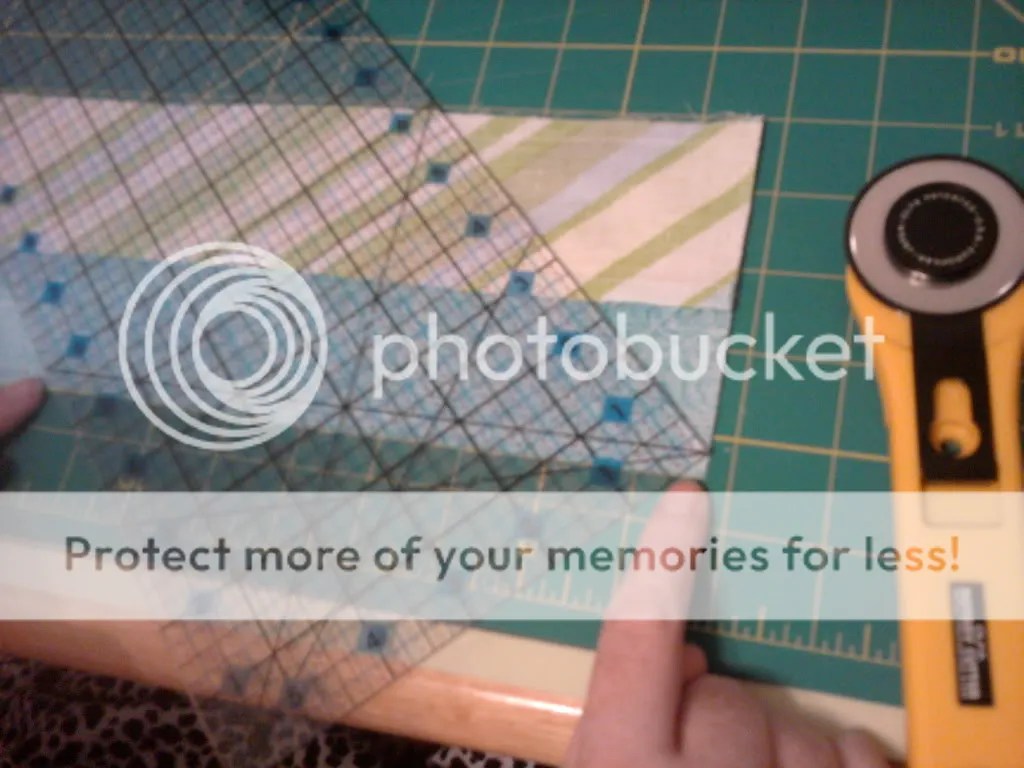
Lay the ruler’s 45 degree angle on the seam. Not on the edge of the fabric. Cut along the edge.

Move the ruler to the opposite seam in the same manner, 45 degree angle line on the seam. If you have a perfect square ruler, you can just slide it up. If you are using along rectangle ruler like me, flip the ruler so you can line up your guide line. Your ruler should line up with the seam on both sides. (where my fingers are pointing! 🙂 )

Cut along the ruler edge. This is your first finished piece!

Once you open your triangle, you have your finished square!

Continue cutting, keeping your ruler on the 45 degree mark! You should get 10 pieces from a 45″ width of fabric. Each single tube will make 2 different patterns, creating a huge range of possibilities for  how to lay out your design.

Lay your squares out how you like in 4 piece blocks. You can keep the patterns the same, or make it totally random. Sew 1 to 2, and 3 to 4. Press, then sew these together, matching the seams from the middle of the block.


Press all your blocks flat and lay them out in the pattern you like. Sew these blocks together in rows, then sew the rows together to finish your quilt top!


Here is the finished product, we added a 5″ border around the entire outside in a nice blue and green sort of gumdrop print on white. We also added any left over half triangles we had to the bottom to make a snazzy edge.


Due to time constraints we didnt get to finish this one, but as soon as its finished I will definitely post some pictures up!  Feel free to ask any questions through email or here in the comments. Also if you do make one of these, let me know! I would love to see your results.

Happy Quilting everyone!


Read Full Post »